How to Disable Specific WordPress REST API Endpoints (Without Breaking Your Site)
WordPress enables its REST API by default, and that’s mostly a good thing. Gutenberg depends on it. WooCommerce depends on it. Dozens of plugins depend on it. But “enabled by default” also means that routes you’ve never thought about are publicly accessible right now — returning data to anyone who asks.
The instinct for most developers is to disable the REST API entirely. That’s the nuclear option, and it breaks more than it protects. The better approach is surgical: identify the specific endpoints you don’t need exposed and block only those.
That’s exactly what WPBuoy Endpoint Manager does.
What the WordPress REST API Exposes by Default
Navigate to yourdomain.com/wp-json/wp/v2/ on any WordPress site and you’ll see a directory of routes. By default, WordPress registers endpoints for:
- Posts, pages, and custom post types
- Categories, tags, and custom taxonomies
- Users — including usernames and display names
- Media attachments
- Comments
- Site settings (some fields, for authenticated requests)
Plugins and themes register additional namespaces on top of this. A busy WordPress site can have dozens of active endpoints, many of which serve no public-facing purpose.
Why Not Just Disable the Entire REST API?
A common hardening tip you’ll find online is to add a filter that blocks all REST API requests for unauthenticated users:
add_filter( 'rest_authentication_errors', function( $result ) {
    if ( ! is_user_logged_in() ) {
        return new WP_Error( 'rest_not_logged_in', 'REST API restricted.', array( 'status' => 401 ) );
    }
    return $result;
});
This breaks the block editor. It breaks WooCommerce’s checkout flow. It breaks any plugin that makes authenticated REST API calls on behalf of logged-out users. You’ll spend more time fixing collateral damage than you saved by disabling the API.
The right approach is to block specific routes while leaving everything else intact.
How to Disable Specific Endpoints with WPBuoy Endpoint Manager
WPBuoy Endpoint Manager gives you a full map of every registered REST API endpoint on your site, organized by namespace, with the ability to toggle individual routes on or off.
Step 1: Install the Plugin
Install WPBuoy Endpoint Manager from the WordPress plugin repository. After activation, navigate to Settings → Endpoint Manager in your WordPress admin.
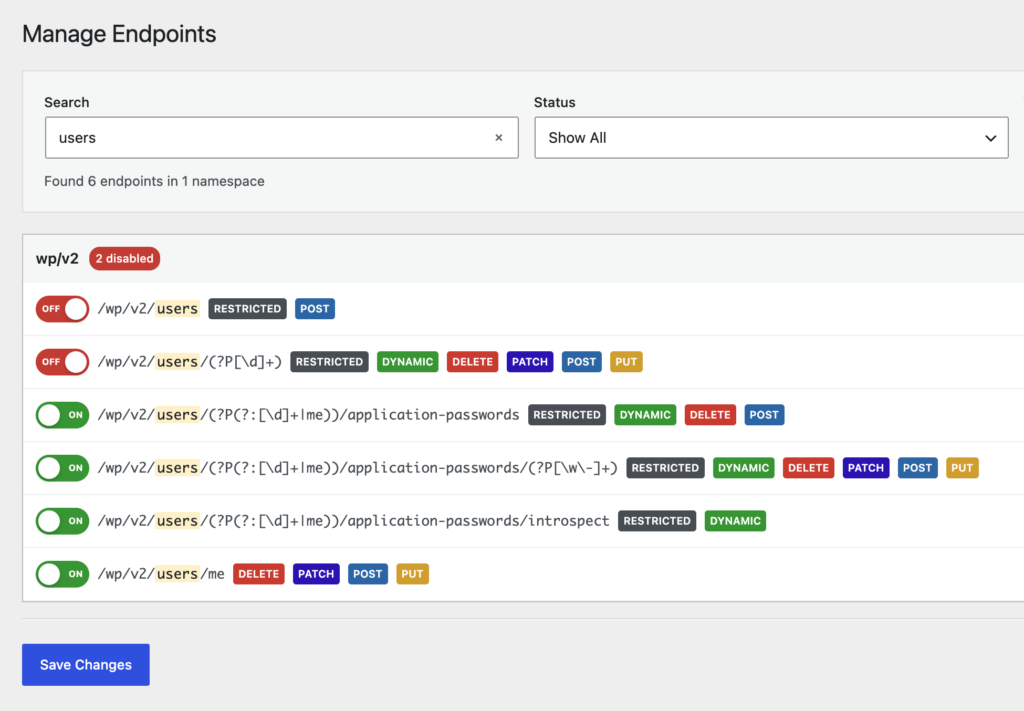
Step 2: Review Your Registered Endpoints
The plugin lists every active endpoint grouped by namespace in a collapsible accordion. Each namespace shows a count badge indicating how many endpoints within it are currently blocked. This gives you an immediate overview of your site’s API surface without needing to visit /wp-json directly.
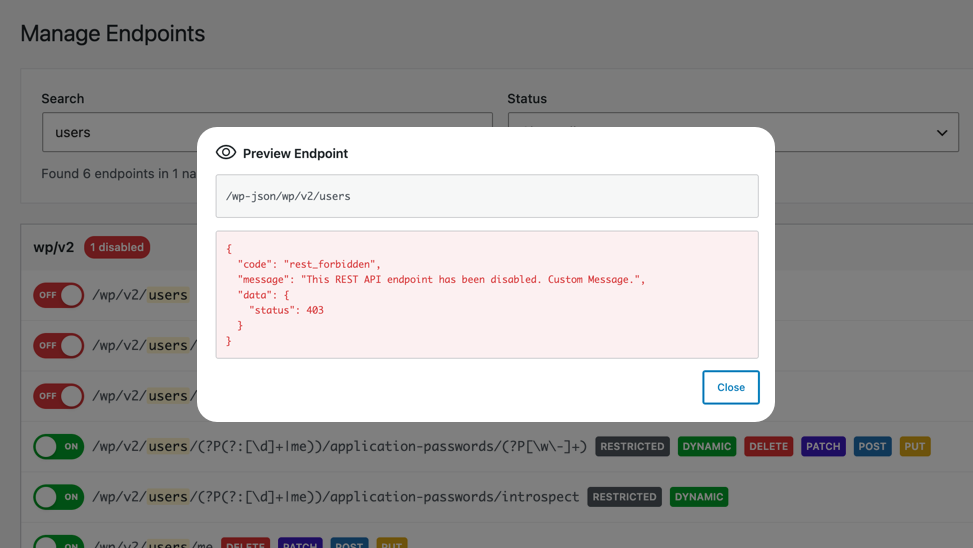
Step 3: Preview Before You Block
Before disabling an endpoint, use the Preview button next to any route to open its current response in a new tab. This lets you confirm what data the endpoint is returning — and whether blocking it will affect anything on your site — before making any changes.

Step 4: Toggle Endpoints Off
Click the toggle next to any endpoint to disable it. When you attempt to block a new endpoint, the plugin shows a save confirmation dialog so you don’t accidentally disable something in production without intending to. Blocked endpoints return a 403 Forbidden response to any request, authenticated or not.

Which Endpoints Should You Consider Blocking?
Every site is different, but these are the most commonly blocked routes:
- /wp/v2/users — Exposes usernames. No public site needs to serve this.
- /wp/v2/posts — If your posts are private or you’re running a members-only site, this is a leak.
- /wp/v2/media — Your media library shouldn’t be a public index.
- /wp/v2/comments — If you don’t use comments, disable the route.
- Any plugin namespaces you don’t use — Many plugins register REST routes that serve internal admin functionality. If you’re not using those features, the route has no reason to be public.
The safest way to find dead weight: use the Preview button to check each route. If it returns data you don’t recognize a public need for, consider blocking it.
What You Get with Endpoint Manager Pro
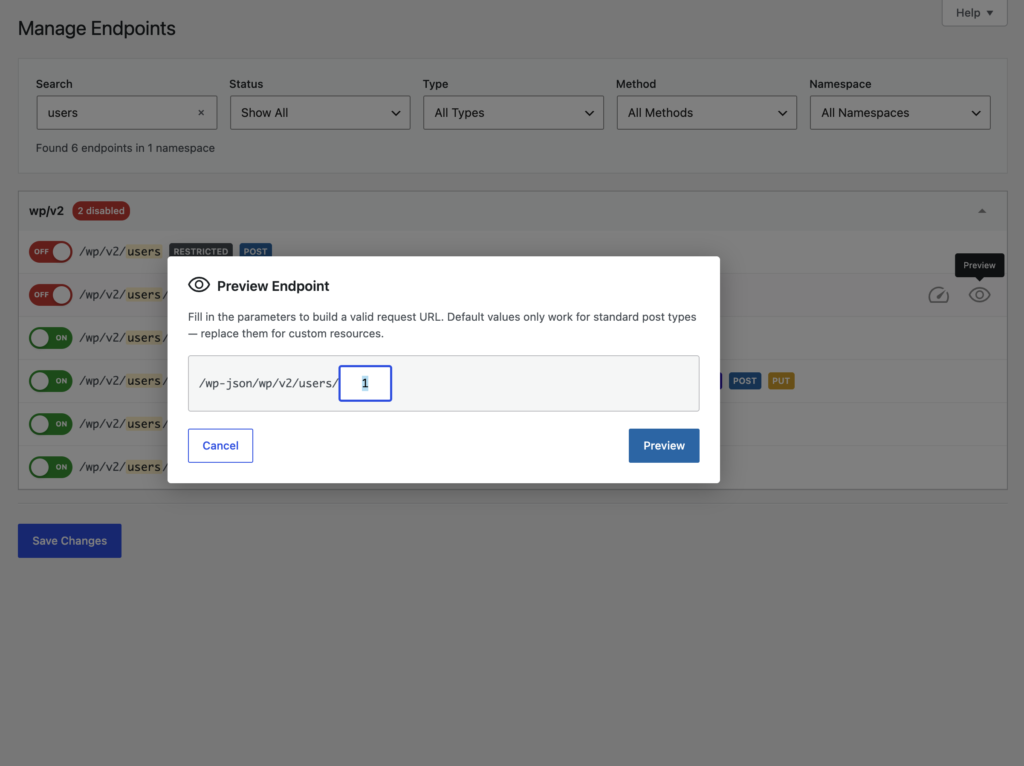
The free version covers static routes — the vast majority of registered endpoints. The Pro version extends this to dynamic routes (routes with URL parameters like /wp/v2/posts/(?P<id>[\d]+)), adds regex pattern matching for bulk blocking, and unlocks an in-line preview modal so you can test parameterized routes without leaving the admin screen.
Pro also adds a security log that records every hit against a blocked endpoint: IP address, route, user agent, and timestamp. If someone is actively probing your API, the log shows you exactly what they’re testing and from where. Logs are searchable, filterable, and exportable to CSV. They auto-purge after 30 days.
Advanced search (Ctrl/Cmd+F with result highlighting) and multi-criteria filtering — by status, route type, HTTP method, and namespace — make navigating large endpoint lists significantly faster on plugin-heavy sites.
Block What You Don’t Need
Disabling the entire REST API is a shortcut that creates more problems than it solves. Blocking specific endpoints takes five minutes and doesn’t break anything. Start with /wp/v2/users, work through the rest of your namespaces with the Preview tool, and block anything that has no legitimate public use.
Download WPBuoy Endpoint Manager free from WordPress.org, or get Pro for dynamic route support and security logging.